A glitchy, flickering, or otherwise misbehaving screen on your Chromebook can be incredibly frustrating. What was once a reliable, portable companion suddenly becomes an irritation, making work, study, or simple browsing almost impossible. While Chromebooks are known for their simplicity and robust Chrome OS, their screens aren't immune to issues. The good news is that many common screen glitches can be fixed with a bit of troubleshooting.
This super pillar hub is designed to guide you through every step of diagnosing and resolving your Chromebook's screen problems. We'll start with easy checks and move towards more advanced solutions, ensuring you have all the information you need to get your display back to perfect working order. Let's dive in and demystify those annoying screen glitches.
Understanding What Causes Your Chromebook Screen to Glitch
Before you can fix the problem, it helps to understand what might be causing it. A glitchy screen usually points to a display malfunction, and these can stem from either hardware or software issues. Chromebooks, by nature, have fewer components than traditional laptops, but this doesn't make them immune to display issues when something goes wrong with a component.
Common culprits often include a loose display cable, a faulty internal screen, or even the battery struggling to provide consistent power. On the software side, corrupted files, outdated drivers, or recent Chrome OS bugs can all manifest as screen anomalies. Pinpointing the exact source is the first crucial step to a successful fix, and you can get a deeper understanding of these underlying issues by exploring Diagnosing Common Chromebook Screen Glitches.
Initial Steps: Simple Fixes for Intermittent Glitches
Sometimes, the simplest solutions are the most effective. Before you dive into more complex troubleshooting, try these basic steps. They're quick, easy, and often resolve minor software hiccups or temporary glitches.
- Connect to an External Display: Grab an external monitor and connect your Chromebook via HDMI or USB Type-C/Thunderbolt. If the external screen works perfectly without flickering, your internal display is likely the culprit. If the external display also flickers, the problem is more likely software-related. This quick test helps narrow down the problem significantly.
- Perform a Standard Restart: It might sound obvious, but a simple restart can clear temporary software bugs or memory issues that are causing your screen to act up. Save your work, close all applications, and restart your Chromebook normally.
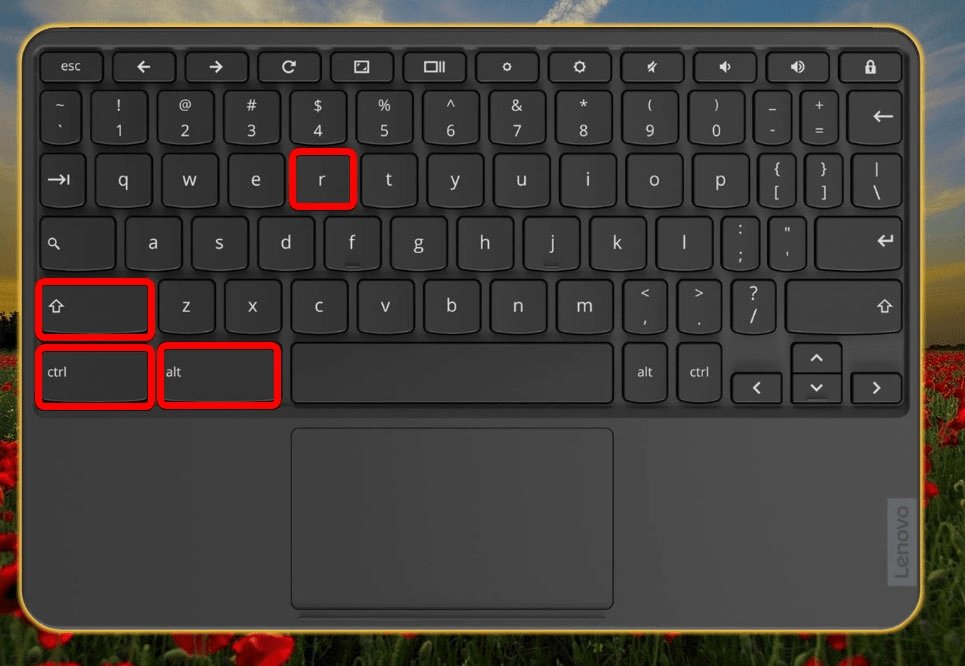
- Execute a Hard Reset: For a more thorough reboot, try a hard reset. Press and hold the Power Button and the Refresh (circular arrow) button simultaneously for about 5-6 seconds. Your Chromebook will power down and then restart. This can often resolve deeper system hangs or display driver glitches.
- Disconnect External Devices: Unplug all USB drives, peripherals, and anything else connected to your Chromebook. Sometimes, a faulty or corrupted external device can interfere with your system, including display output. Restart your Chromebook after removing them to see if the issue persists.
Tackling Software-Related Screen Glitches
If your initial checks didn't resolve the issue, it's time to dig into the software side of things. Chrome OS is generally stable, but updates, settings, or accumulated data can sometimes lead to display problems. These fixes focus on ensuring your system is up-to-date and free from software conflicts.
- Adjust Display Settings: Navigate to your Chromebook's Settings > Device > Display. Experiment with adjusting the resolution to a slightly lower setting. Sometimes, an unsupported or conflicting resolution can cause flickering. You can always revert if it doesn't help.
- Check for Chrome OS Updates: Google frequently releases Chrome OS updates that include performance enhancements and bug fixes. A glitchy screen might be due to a known bug that's already been addressed in a newer version. Go to Settings > About ChromeOS > Check for updates. Install any available updates and restart your Chromebook.
These steps are often successful in resolving issues tied to the operating system or its configuration. For a deeper dive into specific software troubleshooting techniques, including more granular system adjustments, be sure to consult our guide on how to Fix software-related screen glitches.
Conducting Basic Hardware Checks and Troubleshooting
When software solutions don't cut it, the problem might reside in the hardware itself. Don't worry, you don't need to be a tech expert to perform some basic hardware checks. These steps focus on accessible components and connections that can often be the source of a glitching screen.
While many hardware issues require professional attention, there are a few things you can safely check yourself. For instance, ensuring your charging cable is securely plugged in and not damaged can sometimes solve flickering related to insufficient power delivery. It's surprising how often a loose connection can cause seemingly complex problems. If you're ready to investigate the physical aspects of your Chromebook, our comprehensive guide offers detailed instructions on Basic Hardware Checks & Troubleshooting.
Advanced Chrome OS Recovery & Reset Options
If you've exhausted the simpler software and hardware checks, it might be time for a more drastic, but often highly effective, solution: resetting your Chromebook to its factory settings. This step should be approached with caution as it will erase all local data.
- Perform a Powerwash (Factory Reset): This action restores your Chromebook to its original factory state, effectively wiping all user data and settings. It's a powerful way to eliminate any deeply embedded software corruption or persistent bugs. Crucially, backup all your important files to Google Drive or an external storage device before you proceed! To Powerwash, go to Settings > System preferences > Reset. After the reset, set up your Chromebook as if it were brand new.
Powerwashing can solve a multitude of problems that simpler fixes cannot, making it an invaluable tool for stubborn issues. For step-by-step guidance on how to safely perform a Powerwash and other recovery options, refer to our detailed article on Advanced Chrome OS Recovery &.
Addressing Physical Screen Damage and Component Issues
Sometimes, the glitch isn't a software bug or a loose connection, but a more significant hardware failure. These issues often require more specialized tools or professional expertise, but it's good to know what they entail.
- Inspect the Display Cable (Advanced): If you're comfortable and your Chromebook's warranty allows, opening the case to inspect the internal display cable can be an option. A loose or damaged cable connecting the screen to the motherboard is a common cause of flickering. Re-securing it might fix the problem. If it looks frayed or damaged, it might need replacement.
- Battery Voltage Check: A failing battery that isn't providing adequate voltage or amperage can manifest as screen flickering, especially under load. This typically requires professional equipment to diagnose accurately.
- Warranty Claim & Professional Help: If your Chromebook is still under warranty, contact the manufacturer immediately. They can often repair or replace faulty hardware without cost, provided the damage isn't due to user negligence. If the warranty has expired, or if you're uncomfortable with internal hardware checks, it's always best to take your Chromebook to a trusted professional repair shop. They have the expertise to diagnose and Fix screen and component issues, including replacing faulty displays or internal components.
Remember, attempting advanced hardware repairs yourself can void your warranty or cause further damage if not done correctly. It's always best to weigh the risks and seek professional assistance when in doubt.
Getting Your Chromebook Screen Back to Flawless
A glitchy Chromebook screen is certainly an annoyance, but rarely a death sentence for your device. By systematically working through these troubleshooting steps, from the simplest restarts to more involved hardware inspections and software resets, you significantly increase your chances of finding a solution. Whether it's a quick software patch or a deeper hardware fix, armed with this knowledge, you're well on your way to enjoying a clear, stable display once again.