A brilliant Chromebook display is more than just eye candy; it's your window to productivity, learning, and entertainment. When that window starts flickering, goes dark, or sports an unsightly crack, it's not just an inconvenience – it's a roadblock. While some screen problems demand a repair, many can be sidestepped entirely with smart habits and a proactive approach. This guide dives deep into preventative measures to avoid Chromebook screen problems, ensuring your device stays pristine and performs flawlessly for years to come.
Chromebooks, renowned for their affordability, simplicity, and portability, come in various screen configurations—touch, non-touch, convertible, and different sizes and resolutions. Regardless of your model, a functional screen is the linchpin of your experience. Neglecting its care not only mars your daily use but also threatens device longevity and resale value, potentially leading to costly repairs down the line.
At a Glance: Keeping Your Chromebook Screen Perfect
- Shield It: Always use a protective case and a padded sleeve for transport.
- Handle with Care: Avoid drops, pressure on the screen, and placing heavy objects on the closed lid.
- Clean Smart: Use a microfiber cloth and avoid harsh chemicals.
- Stay Updated: Keep Chrome OS and graphics drivers current.
- Check Connections: Ensure internal display cables are snug (for advanced users/professionals).
- Address Issues Promptly: Don't let a minor glitch become a major headache.
Why Your Chromebook's Screen is So Crucial
Think about it: nearly every interaction you have with your Chromebook funnels through its display. From crafting essential documents and attending video conferences to streaming your favorite shows or video chatting with family, the screen is central. A vibrant, clear, and responsive display isn't just a luxury; it's fundamental for productivity, an enjoyable user experience, and even safety, as visual cues guide your digital journey.
Beyond the immediate functional aspects, the health of your screen significantly impacts your Chromebook's overall lifespan and eventual resale value. A well-maintained screen is a hallmark of a cared-for device, signaling reliability and attention to detail. Conversely, a damaged screen is often the gateway to further internal issues, as cracks can expose sensitive components to dust and moisture, accelerating deterioration.
Behind the Glitch: Common Chromebook Screen Woes
To effectively prevent screen problems, it helps to understand what causes them. Many screen issues, while seemingly sudden, often have identifiable roots.
- Cracked Screens: These are typically the result of physical trauma. Accidental drops, impact from foreign objects, or excessive pressure on the lid (e.g., stacking books on a closed Chromebook) are common culprits. Sometimes, a manufacturing defect can lead to a weakened screen, making it more susceptible to cracking under minimal stress.
- Screen Flickering: This can be a frustrating and distracting issue. It often points to outdated graphics drivers, which can usually be resolved with a software update. However, flickering can also signal a loose internal connection between the screen and the motherboard, or even a hardware malfunction within the display panel itself.
- Black Screen: A completely dark screen can be alarming. It might be a simple software glitch that a quick reboot can resolve, or perhaps incorrect display settings have inadvertently dimmed your screen to zero brightness. More severe causes include damaged internal components like faulty display cables, a defective screen panel, or even motherboard issues. Acer Chromebooks, for instance, have occasionally experienced temporary black screen conflicts due to software.
- Dead Pixels: These are tiny, permanent dots on your screen that fail to display color, appearing as persistent black, white, or colored spots. While sometimes a manufacturing defect, dead pixels are often the consequence of physical damage to the liquid crystal display (LCD) panel, where individual transistors are no longer functioning correctly.
Understanding these underlying causes provides the blueprint for our preventative strategies.
The Proactive Playbook: Essential Preventative Measures
Prevention is always better—and cheaper—than cure. By integrating a few simple habits into your routine, you can drastically reduce the likelihood of encountering frustrating Chromebook screen problems.
Shielding Against Physical Damage
The most common screen issues stem from physical impact. Your first line of defense is robust physical protection.
- Invest in a Quality Protective Case: This is perhaps the single most impactful preventative measure. A good hard-shell or rugged case absorbs shocks and impacts, significantly reducing the risk of screen damage from accidental drops. Look for cases specifically designed for your Chromebook model to ensure a snug fit and access to all ports.
- Use a Padded Sleeve for Transport: Even with a case, a padded sleeve provides an extra layer of cushioning when you're on the move. When stowing your Chromebook in a backpack or bag, the sleeve protects it from jostling against other items and minimizes the effects of bumps.
- Handle with Care: This sounds obvious, but it's often overlooked. Always pick up your Chromebook from its base, not by the screen. Avoid gripping the screen's edges or applying undue pressure when opening or closing the lid. Teach children and other users to handle the device gently.
- Avoid Pressure on the Closed Lid: Never stack books, heavy bags, or any other objects on top of your closed Chromebook. The pressure can easily transfer to the display panel, causing cracks or internal damage that might not be immediately visible. Similarly, be mindful of where you place it; don't leave it in a position where someone might accidentally sit or lean on it.
- Clear the Keyboard Before Closing: Before closing your Chromebook, always double-check that there are no objects (pens, USB drives, loose papers, crumbs) on the keyboard. Even a small item can exert immense pressure on the screen when the lid is closed, leading to cracks or dead pixels.
Mastering the Art of Cleaning
A clean screen isn't just about aesthetics; it's about maintaining optical clarity and preventing abrasive damage.
- Regular Cleaning with a Microfiber Cloth: Dust, fingerprints, and smudges accumulate quickly. Use a clean, dry, soft microfiber cloth to gently wipe your screen regularly. For stubborn smudges, slightly dampen a corner of the cloth with distilled water – never spray directly onto the screen. Wipe in one direction to avoid streaks.
- Avoid Harsh Chemicals and Abrasives: Steer clear of window cleaners, alcohol-based solutions, ammonia, or any abrasive materials (like paper towels or rough cloths). These can strip away the screen's anti-glare or oleophobic (oil-repelling) coatings, leaving permanent damage and a diminished display quality. If you need a screen-specific cleaner, opt for one explicitly labeled as safe for electronics and apply it to the cloth, not the screen.
Smart Usage Habits
How you use and store your Chromebook can also play a role in screen longevity.
- Optimal Viewing Angles, Gentle Adjustments: While Chromebooks offer various viewing angles, especially convertible models, always adjust the screen gently. Avoid forcing it past its natural hinge resistance. Repeated rough adjustments can stress the display cables over time, potentially leading to flickering or intermittent display issues.
- Mind the Environment: Extreme temperatures can affect electronic components, including your screen. Avoid leaving your Chromebook in direct sunlight, a hot car, or very cold environments for extended periods. Rapid temperature changes can also cause condensation, which is detrimental to electronics.
- Use Touchscreens with Care (If Applicable): If your Chromebook has a touchscreen, use light, deliberate touches. While designed for interaction, excessive force can still damage the underlying panel or coatings. Keep your hands clean to avoid transferring oils and grime.
Software Savvy for Screen Stability
Not all screen problems are physical. Software can also be a culprit, and regular maintenance can prevent these digital headaches.
- Keep Chrome OS and Drivers Updated: Google regularly releases Chrome OS updates that include performance enhancements, security patches, and, crucially, updated graphics drivers. Outdated drivers are a common cause of screen flickering or display glitches. Always ensure your Chromebook is running the latest version by navigating to
Settings > About Chrome OS > Check for Updates. Regularly checking for updates is a straightforward yet powerful preventative step. - Perform Regular Restarts: While Chromebooks are designed for always-on convenience, a fresh restart can clear temporary software conflicts and refresh system resources. If you notice any minor display anomalies, a simple reboot is often the first, and most effective, troubleshooting step. This helps prevent minor glitches from escalating into more persistent issues.
When Prevention Isn't Enough: Early Detection & Troubleshooting
Even with the best preventative measures, sometimes issues arise. Knowing how to spot early warning signs and perform initial checks can prevent a minor problem from becoming a costly repair.
Spotting the Early Warning Signs
Pay attention to subtle changes in your display.
- Intermittent Flickering: If your screen flickers occasionally, especially when opening or closing the lid, it could indicate a loose internal cable that needs to be re-seated. Addressing this early can prevent it from worsening into a complete black screen.
- Unusual Pixels: Keep an eye out for any new, persistent bright or dark spots. These could be dead or stuck pixels. While sometimes harmless, an increase in their number can indicate broader panel degradation.
- Color Distortions: If colors suddenly appear off, or you notice lines or patterns that shouldn't be there, it's a signal to investigate. This could point to driver issues or a failing display cable.
Initial Software Checks for Common Issues
Before you even think about opening your Chromebook, rule out software-related issues. Many display problems, especially flickering or a black screen, can be resolved without hardware intervention.
- Brightness and Display Settings: A black screen could be as simple as the brightness being turned all the way down. Use the brightness keys on your keyboard (often F6/F7 or dedicated sun icons) to increase it. Also, check your display settings in Chrome OS to ensure no external display modes are active, or resolution settings aren't mismatched.
- A Simple Reboot: For temporary software glitches causing flickering or unresponsiveness, a quick power cycle often works wonders. Turn off your Chromebook, wait 30 seconds, and then turn it back on.
- Perform a Hard Reset: If a simple reboot doesn't work, a hard reset can resolve many common hardware-related issues, including display problems. To do this, press and hold the Refresh key (the circular arrow icon above the '3' key) and the Power button simultaneously until your Chromebook restarts. This doesn't erase your data but can reset power management and other hardware connections.
- Check for Chrome OS Updates (Again): We mentioned this as a preventative measure, but if you're experiencing flickering or other issues, double-check that your system is fully updated. Go to
Settings > About Chrome OS > Check for updates. If your screen is unresponsive, you might try entering recovery mode (see below) to update Chrome OS. - Boot in Safe Mode/Recovery Mode: For a persistent black screen or issues after an update, booting into recovery mode can help. Press Esc + Refresh (circular arrow) + Power simultaneously until the device restarts. This can sometimes allow you to update or reset the OS if a corrupted update is the culprit. A corrupted update can indeed lead to a black screen, and recovery mode offers a path to rectify it. For more detailed troubleshooting, you might find our guide on how to fix Chromebook screen glitches helpful, as it covers a range of software and minor hardware fixes.
Navigating Repairs: DIY, Professional, or Replacement?
Sometimes, despite your best efforts, prevention isn't enough, and a screen issue materializes. At this point, you're faced with a decision: can you fix it yourself, or is it time to call in the experts?
Assessing the Damage
The first step is to accurately diagnose the problem. A cracked screen, dead pixels, persistent flickering, or a black screen each have different implications for repair. Understanding the specific model of your Chromebook is crucial here, as screen designs and internal layouts vary widely.
DIY Considerations: When You Might Try It
For specific issues, DIY repair is feasible for those comfortable with small electronics, but it requires patience and the right tools.
- Tools You'll Need:
- Microfiber cloth: For cleaning and protecting components.
- Pry tool or flathead screwdriver: Essential for gently removing bezels.
- Screwdriver set: Specific to your Chromebook model (often small Philips head).
- Double-sided adhesive tape: To re-secure the bezel or screen in some models.
- Replacement screen: Only if confirmed needed – source a genuine or high-quality compatible screen for your exact model.
- Common DIY Repair Scenarios:
- Cracked Screen Replacement: This is the most common DIY hardware repair.
- Power Down & Unplug: Always turn off your Chromebook and disconnect all power sources.
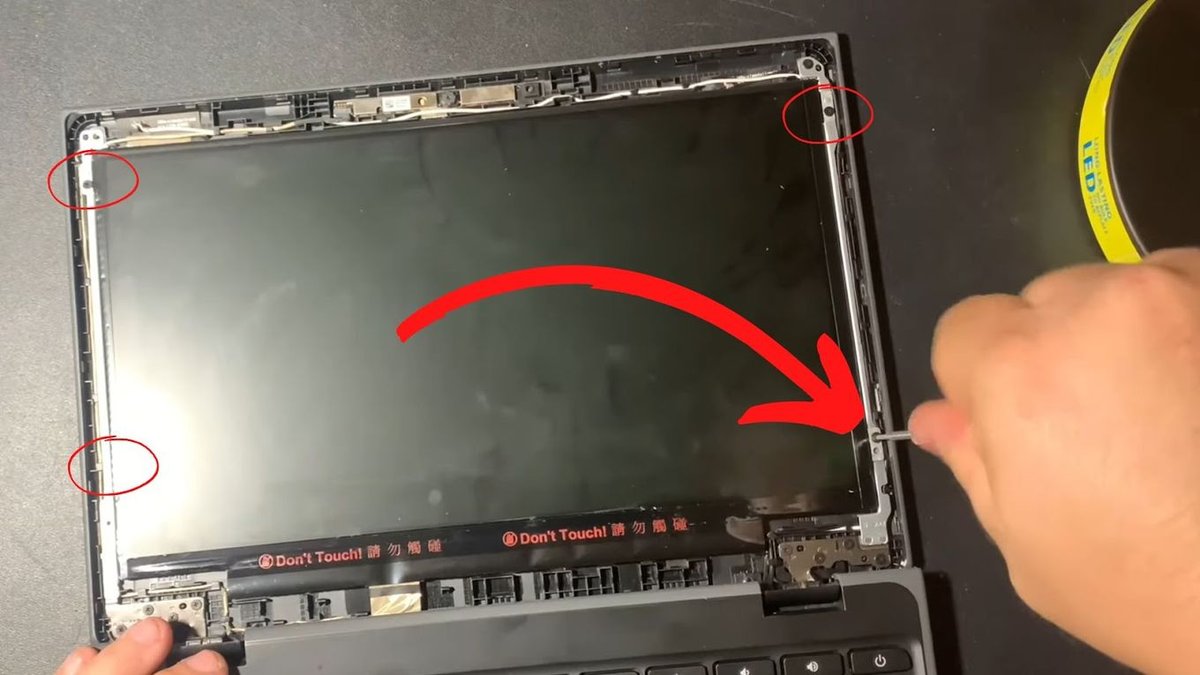
- Remove Bezel: Gently use a pry tool to separate the plastic bezel around the screen. Work slowly and carefully to avoid damaging clips.
- Unscrew & Disconnect: Unscrew any screws holding the screen in place. Carefully lift out the damaged screen and disconnect the delicate ribbon cables from the back.
- Install New Screen: Place the new screen, reconnect cables firmly, and secure with screws.
- Reassemble: Snap the plastic bezel back on.
- Test: Turn on the Chromebook to test the new screen.
- Screen Flickering (Hardware): If software updates haven't helped, and you suspect a loose internal cable (especially if the flickering varies when opening/closing the lid), you might open the device to check connections between the screen and the motherboard. This requires careful disassembly and reassembly, often involving the steps for a screen replacement, but without actually replacing the screen. Ensure all cables are seated firmly.
- Dead Pixels (Minor): For a single dead pixel, you can try gently rubbing the affected area with a microfiber cloth to rule out dust. Some users also report success with "pixel-fixing" software like JScreenFix or UDPixel, which rapidly cycle colors to try and "wake up" the pixel. If these don't work, however, replacement is the only true fix.
Crucial Safety Tips for DIY Repairs:
Your safety and the device's integrity are paramount.
- Always turn off and unplug your device before attempting any internal repairs. This prevents electrical shorts and potential shocks.
- Be gentle when handling delicate screen components, cables, and connectors. They are fragile and easily damaged.
- Wear protective gear, such as anti-static gloves (to prevent static discharge) and safety glasses, especially when dealing with potentially sharp edges of a broken screen.
- Work in a clean, well-lit, and organized space. This prevents losing tiny screws and keeps dust out of delicate components.
When to Call a Pro
While some fixes are DIY-friendly, many internal screen issues are best left to professionals.
- Uncertainty and Complex Issues: If you're unsure about the cause, uncomfortable with disassembly, or if the issue seems to stem from a motherboard problem or extensive internal damage, seeking professional help is the wisest course.
- Persistent Black Screen/Flickering: If software troubleshooting and basic internal cable checks don't resolve a black screen or persistent flickering, it often indicates a deeper hardware problem—a faulty screen panel, a damaged motherboard component, or a severed internal cable. These require specialized tools and diagnostic expertise. A loose internal cable can indeed cause flickering or a black screen, but accessing and securing it safely often requires a professional touch.
- Warranty Concerns: Attempting DIY repairs might void your Chromebook's warranty. If your device is still under warranty, contact the manufacturer or retailer first.
The Cost of Screen Replacement
Should a full screen replacement be necessary, either DIY or professional, consider the financial aspect. The average cost for a new Chromebook screen panel typically ranges from $50 to $200, depending on your model, screen size, and features (e.g., touchscreen vs. non-touch).
- DIY Cost: Just the cost of the part.
- Professional Repair Cost: Includes the part plus labor, which can significantly increase the total.
- Third-Party vs. Genuine Parts: Third-party screens might be cheaper, but they often come with risks of lower quality, poor compatibility, or even a shorter lifespan. Whenever possible, opt for genuine OEM (Original Equipment Manufacturer) parts or reputable aftermarket alternatives.
- Warranty or Protection Plans: If you have a warranty or an extended protection plan, screen issues are often covered. This can save you a substantial amount of money and stress. Always check your coverage details before proceeding with any repair.
Powerwash After Screen Replacement?
A Powerwash, which is a factory reset of your Chromebook, is generally not necessary after a screen replacement. A screen replacement is a hardware fix and doesn't directly interact with the operating system's software files. However, a technician might recommend a Powerwash if they suspect underlying software issues contributed to the problem or if they want to ensure a completely fresh start for the device after significant hardware work. If a Powerwash is performed, always back up any important files first, as it will erase all local data.
Your Questions, Answered: Chromebook Screen FAQs
Here are some quick answers to common questions about Chromebook screen issues:
Q: Can a hard reset fix screen issues?
A: Yes, a hard reset (pressing and holding the Refresh key and the Power button simultaneously) can often resolve minor software-related screen glitches or temporary display problems by resetting the power management and hardware connections without erasing your data.
Q: My Chromebook screen went black after an update. What should I do?
A: First, try a simple reboot and then a hard reset. If that doesn't work, try entering recovery mode by holding the Esc key, Refresh key, and Power button simultaneously. From recovery mode, you might be able to update Chrome OS again or perform a system reset if the update caused corruption. A loose internal cable or other hardware problem could also be the cause, so if recovery mode fails, professional help is advised.
Q: Can a loose internal cable cause screen issues like flickering or a black screen?
A: Absolutely. A loose or partially disconnected internal display cable, which connects the screen to the motherboard, is a common culprit for flickering, intermittent display, or a complete black screen. While some tech-savvy users might attempt to reseat it, professional help is often recommended for internal hardware issues due to the delicate nature of the components.
Q: Can updating Chrome OS help fix screen issues?
A: Yes, regularly updating Chrome OS is a crucial preventative and reactive measure. Updates often include new or revised graphics drivers that can resolve flickering, compatibility issues, or other display glitches. Go to Settings > About Chrome OS > Check for updates. If your screen is unresponsive, trying to update via recovery mode might be an option.
Q: How often should I clean my Chromebook screen?
A: It depends on usage, but a quick wipe with a microfiber cloth once a week for light users, or every few days for heavy users (especially those with touchscreens), is a good practice. Always clean it immediately if you notice smudges or spills.
Ensuring Your Chromebook's Brilliant Future
Your Chromebook is a valuable tool, and its screen is arguably its most vulnerable component. By embracing the preventative measures outlined in this guide – from investing in physical protection and practicing careful handling to maintaining software updates and cleaning correctly – you empower yourself to avoid the frustration and expense of screen problems.
Remember, consistency is key. These aren't one-off tasks but habits to integrate into your daily routine. Should an issue still arise, knowing the difference between a simple software glitch and a hardware problem, and when to seek professional help, will save you time and money. With a little proactive care, you can ensure your Chromebook continues to offer a perfect, pristine display, keeping your digital world crystal clear.